BIM Consulting | BIM Solutions > Focus on HOW
BIM-Professional (Technical University of Munich, Germany)
buildingSMART International Qualification
a - Calculate Unit's Areas
b - Create Numbering Sequence
c - Data Tools
Contents
CBM-Data Manager: Units' Areas, numbering and more
CBM-Data Manager is A Python utility for Archicad that helps BIM authors perform those batch data actions that are too tedious to do manually:
- Calculate Units' areas
- Create numbering sequences
- Copy data from one property to another
- Set property status and defaults (sort of... there are limits in the python access)
On the ToDo list:
- Calculate U-values / R-values
- Utilities for Material analysis
Installation
Warning! At the moment the app is still under development.
- Download the app choosing the proper version.
- Enter your access code when prompted
- Save it anywhere you wish and unzip it, for the moment there is no installer
Usage
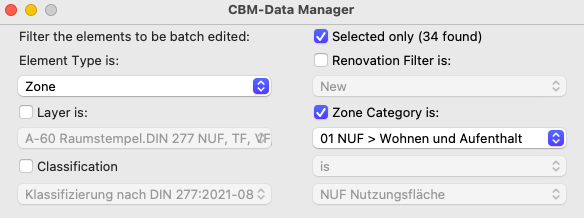
1 - Filter the selection
- Selected only: Restrict the operations to the selected items.
- Element Type: Choose the element type. Every type might have different properties attached, so changing the type will force a regen of the properties in the other fields.
- Zone (Room), Slab, Morph: for Units' areas
- Zone (Room), Slab, Morph, Wall, Column, Beam, Roof, Mesh, Shell, Door, Window, Skylight, CurtainWall, Railing, Stair, Opening, Object: for all data tasks
- Renovation filter is: Enable/disable filtering by Renovation Filter
- Layer is: Enable/disable filtering by layer
- Zone Category is: Enable/disable filtering by Zone Category (only enabled for Zones)
- Classification is: Enable/disable filtering by Classification
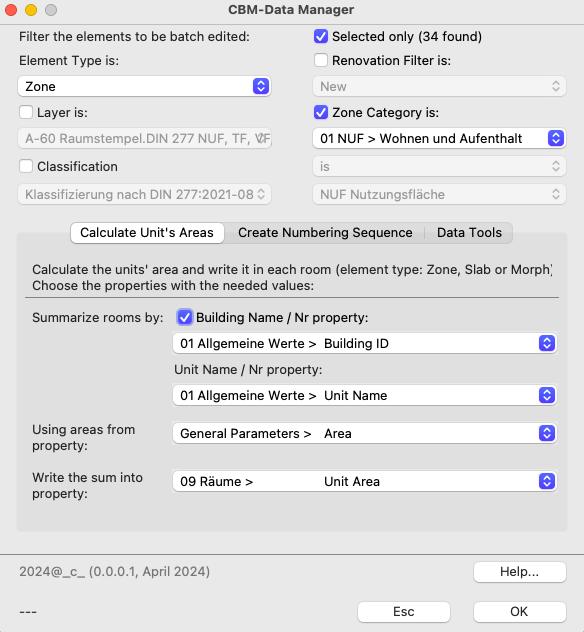
2a - Calculate Unit's Areas (see movie):
In Archicad there is no simple tool to display the sum of areas per unit on drawing. The German AC version contains a complex construct, but it works with the singular GDL parameters and is rather cumbersome to use in practice. One wishes to simply use labels displaying a user-defined property.
In order for a label workflow to work, one needs to write the Area sum per Unit in each room and there is no automatic way in Archicad to do it. So this tool does just that: write the Unit's area sum to a property of your choice.

Quick HowTo:
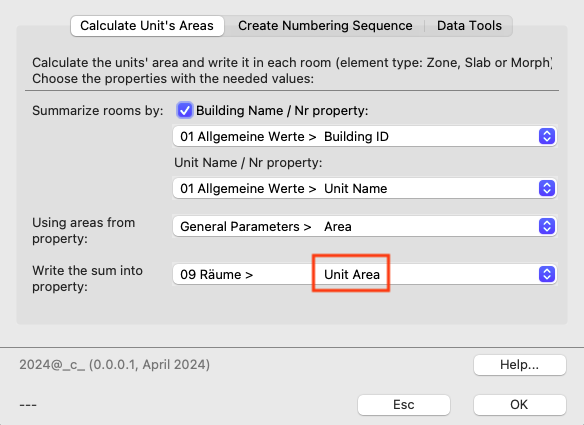
- Summarize rooms by:
- Building Name / Nr property: (Optional) Needed in projects with more than one buildings. Warning! The building name/number (optional) and unit name/number data properties must be correctly filled in for each Zone before running this application: they are used as filters to sort and calculate the sum of areas.
- Unit Name / Nr property: The areas of Zones with the same Unit will be added together.
- Using areas from property: The Area property that you want to sum up by unit. You can use built-in properties or custom properties. The built-in properties are described in detail in the Archicad help, below just a brief description:
Warning: the properties listed depend on the selected element type. If you miss a property, it may be because the type doesn't support it.- Area: General Parameters - Area corresponds to Measured Area as far as I can see. I keep them distinguished anyway, should some hidden deviation be there nevertheless.
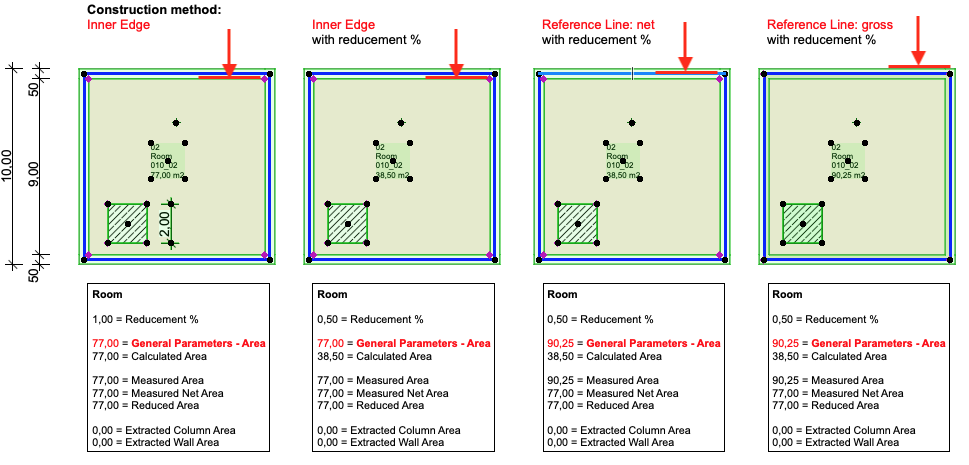
- Calculated Area: Construction method inner edge (not gross)
- Proj. Prefs Wall & Column subtraction ON: Always removes the area of columns or walls, if these are not set to "no effect on zones"
- Proj. Prefs Wall & Column subtraction OFF: Only removes the area of columns or walls, if these are set to "zone boundary"!
- Measured Area: Visible area of the Zone polygon.
- Proj. Prefs Wall & Column subtraction ON or OFF: Only removes the area of columns or walls, if these are set to "zone boundary"!
- Measured Area Net Area: Same as Measured Area, but only net part, when the option is "gross"
- Reduced Area: Affected by the option "area reduction under low ceiling": Warning, this just means that if the zone item is lower than the limit in the project preferences, the area will be reduced accordingly. It is NOT really related to roofs or ceilings.
- choose custom property: user defined area property
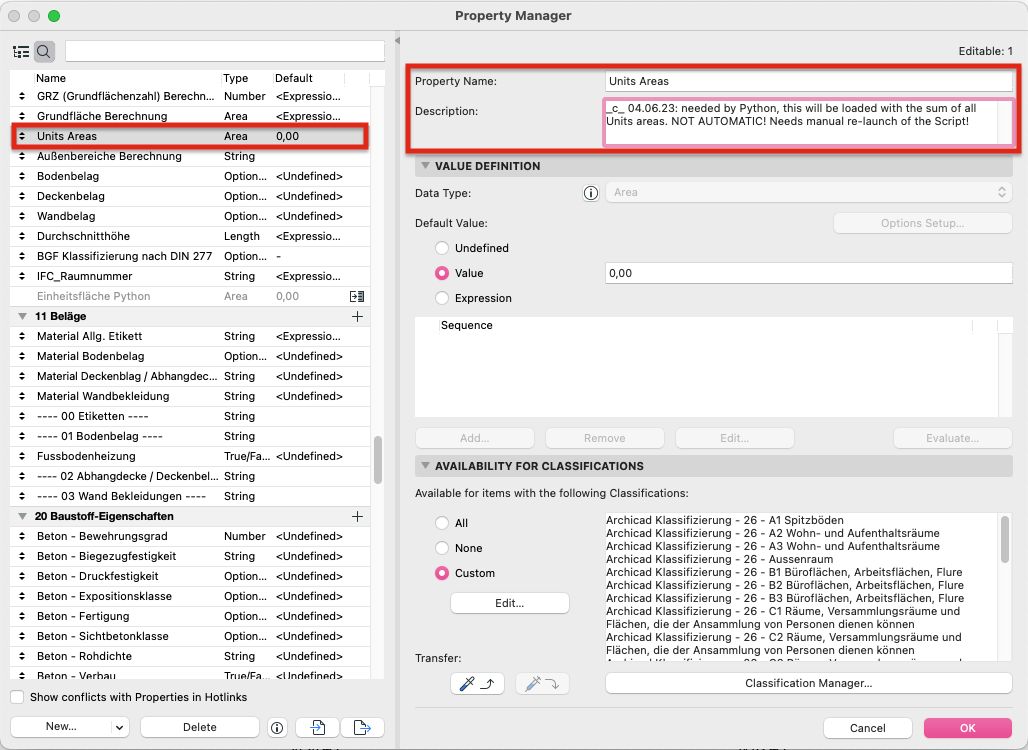
- Write the sum into property: Property where the sum of the unit's areas will be stored. Create one, if missing, and attach it to the Element Type you plan to use. The Units' areas must be stored in every room to be readable consistently by a Label. This can be done manually using properly prepared schedules returning areas by Unit and copy-pasting the displayed value into the chosen field. It is time consuming, error prone and must be redone at every change of the rooms. This tools minimizes effort and errors.
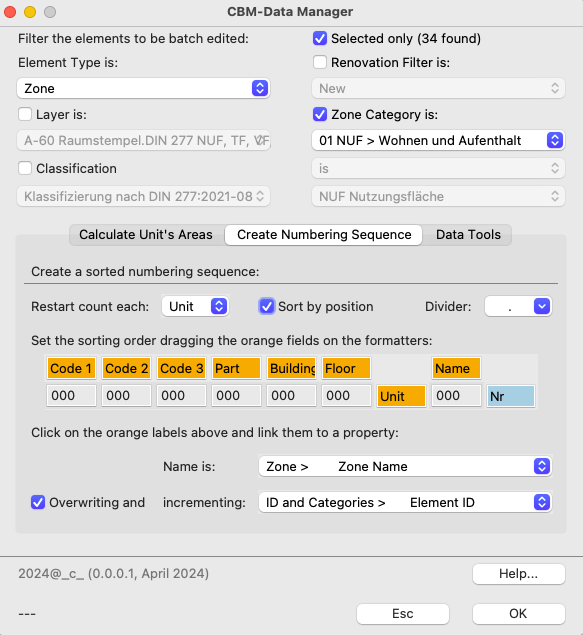
2b - Create Numbering Sequence (see movie):
Create numbering sequences with maximum flexibility and minimal interface: simply drag and drop the orange labels onto the lower row. You can format the individual labels - or not - as needed.
The utility will increment a value in the selected property according to the displayed sort order. The counter can be restarted at relevant breakpoints, for example for each building, floor or unit. You can apply a final sort by position to the overall sort rule.

- Light-gray fields: Formatting
Replace the '000' with the formatting you require. Leave the field blank to remove all formatting. Drag an orange field onto any light grey field to create a sorting sequence.
Examples:- "000" applied to the number "9" will return "009
- "00" applied to the number "9" will return "09"
- "__" applied to the number "9" will return "_9"
- "0000" applied to the value "Erdgeschoss" will return "Erdg"
- Orange fields: Sorting sequence and property definition. There are predefined standard Part, Building, Floor and Unit fields, but also undefined Code fields. This subdivision is purely visual, any field can be linked to any property.
- Create sorting sequence: Drag an orange field onto a light gray field to establish a sequence.
- Link to property: Click on orange field and choose a property in the menues below.
- Examples:
- Sort by Floor > Unit incrementing Nr. If Restart count each is set on Unit, the counter restarts at each unit.
- Sort by Building > Floor > Unit incrementing Nr. If Restart count each is set on Floor, the counter restarts at each floor.
- Restart count each: Set the counter to group by the selected property and restart at each new value.
- Sort by position: Applies a final sorting by position to the last grouping, for example by floor or unit.
- Divider: If overwriting is on, the selected divider will be used. Any character can be entered.
- Incrementing: Select the property to increment according to the sort order.
- Overwriting: Set the selected field to be completely overwritten with the entire sort sequence.
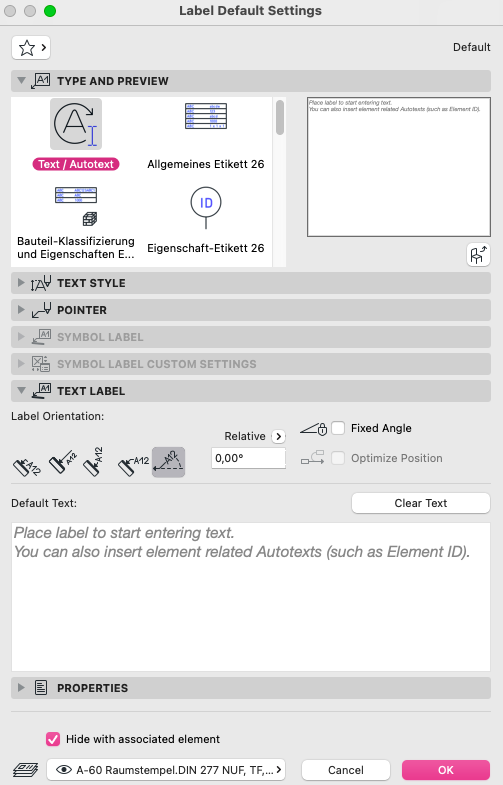
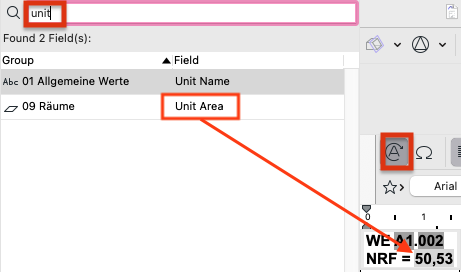
- HowTo: Display Properties in Rooms (when you don't want to use a dedicated label).
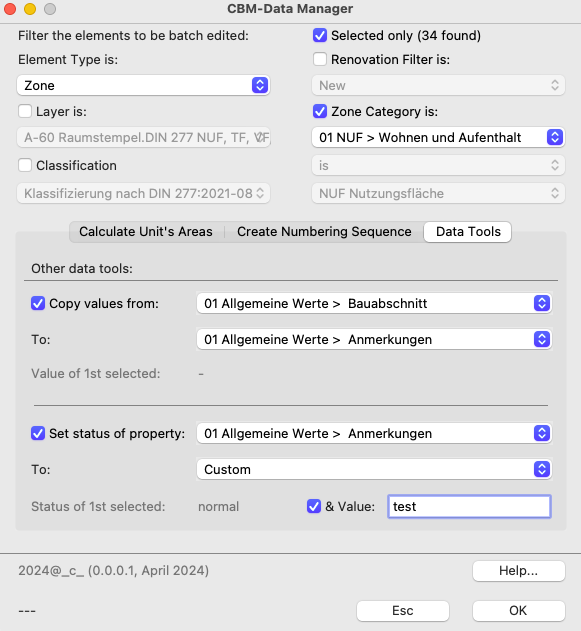
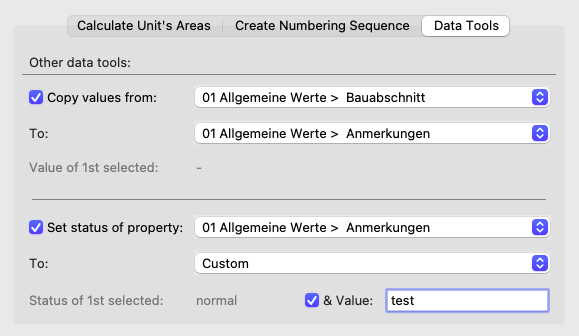
2c - Data Tools
Perform other batch processing actions on data. Copy all values in a filtered selection from one property to another or edit the status and/or defaults.
- Copy values from / to: Choose the property to copy from. This choice will also redefine the property list where to "copy to". Only editable and compatible properties are listed.
Example: if the selected property to "copy from" is of type "number", the list of properties available for "copy to" will be reset to allow only editable properties of type number and string. This because everything can be converted to string, but not to number. - Set Status: Choose the property to set the status of. Values are:
- Default: this doesn't yet link to the real default property setting (currently impossible), it just copies the values from the property definition.
- Custom: enables & Values:
- & Values: change also the values
- Undefined
3 - Perform the batch actions
All rooms will be batch edited according to the settings. A progress line appears on the bottom left corner.
- Help: Click on Help to read more about the different area types for rooms
- ESC: Click on ESC to exit without doing anything
- OK: Click on OK to perform the batch actions, this will also save the preferences.

Knowledge: parameters affecting zone calculations
-
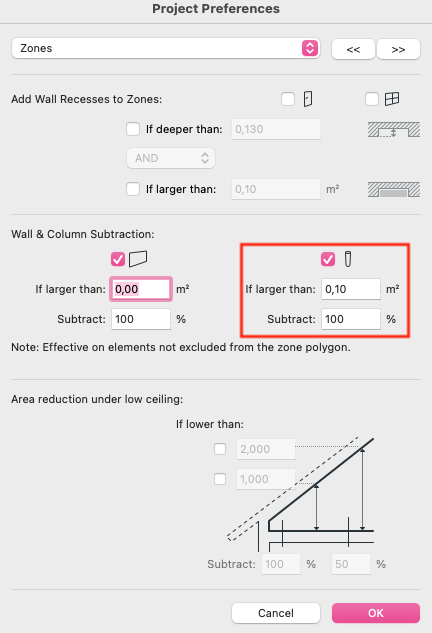
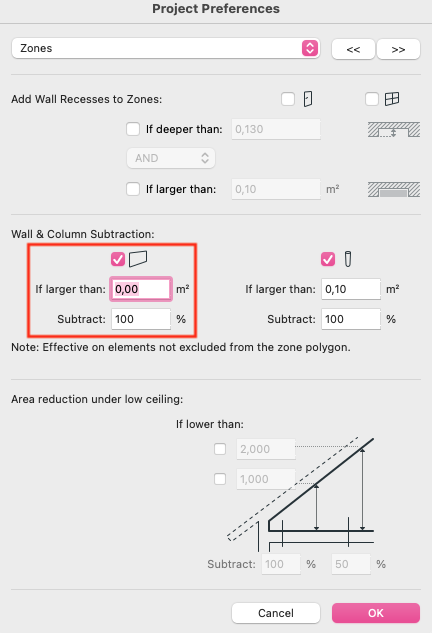
Options > Project Preferences > Zones: Affect the overall calculations for the whole file. If and how elements will be deducted is deeply set.
Warning: the singular Zones won't change automatically, a regen is required! Use Design > Update Zones
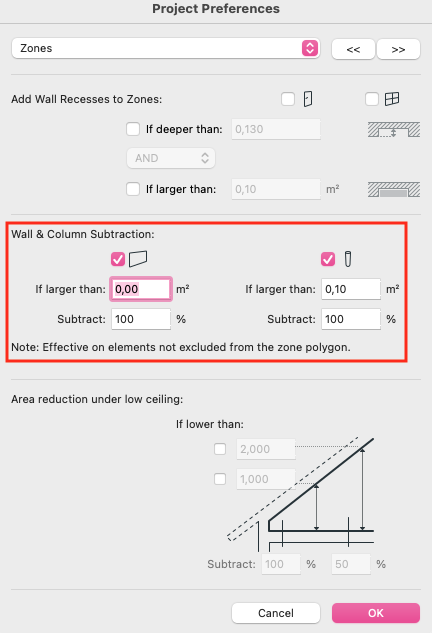
Project Preferences: Wall and columns subtracted
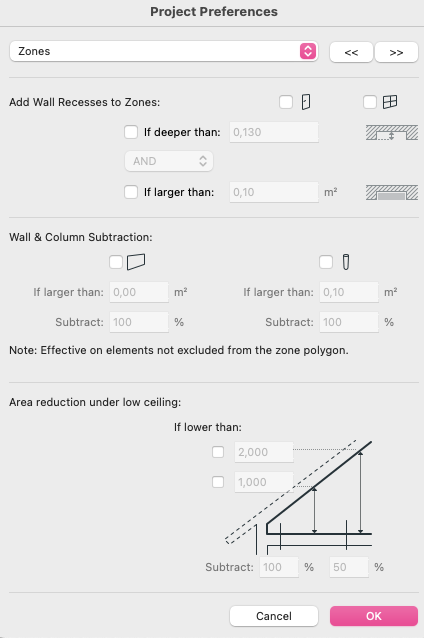
Project Preferences: Wall and columns not subtracted
- Zone settings: parameter "Geometry method"
Describes the zone behaviour related to the wall edges. Note that the "Measured Area" always corresponds to the visible 2D polygon and that "General Parameters - Area" is always the same as "Measured Area".
Facit: use General Parameters - Area.
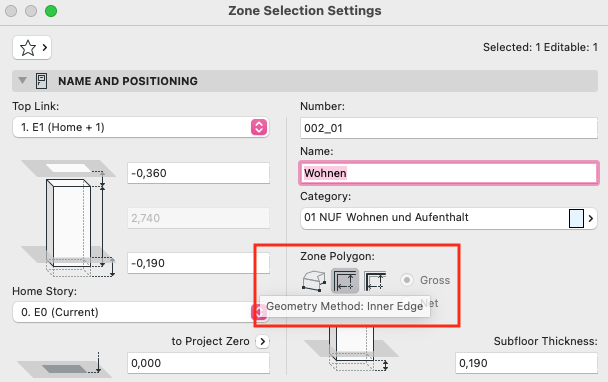
Zone Settings: Geometry method
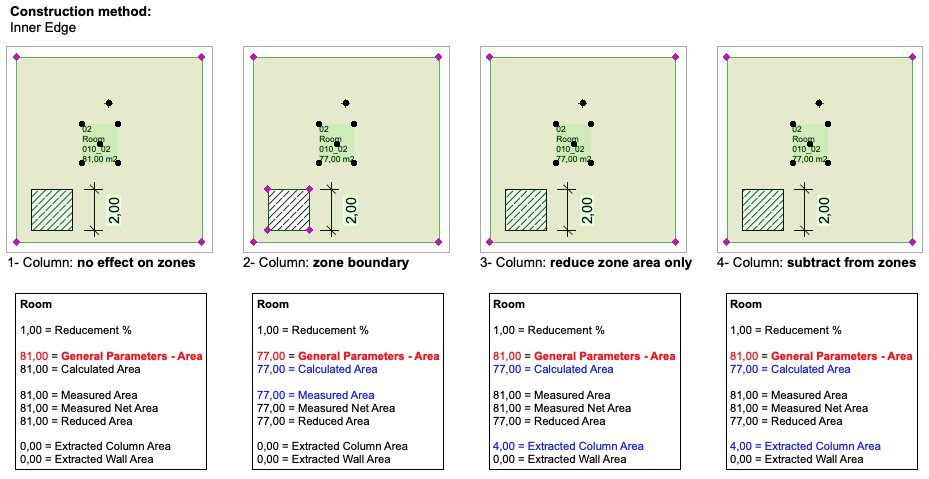
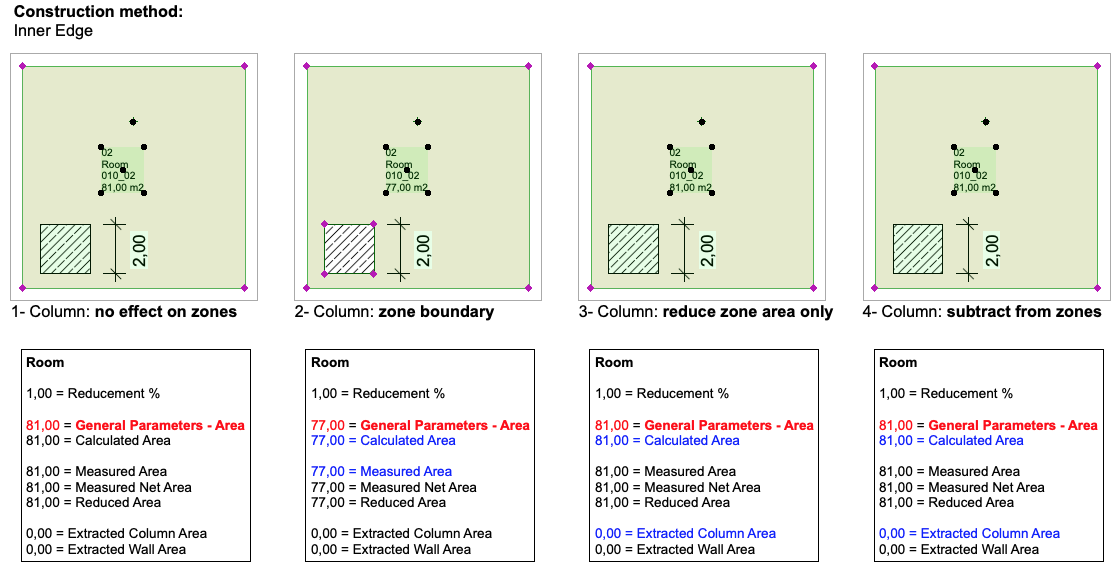
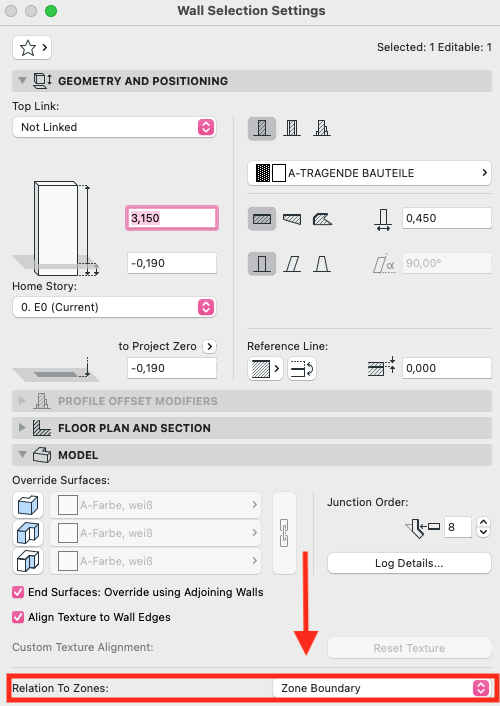
- Column settings: parameter "Relation to Zones"
Note when the zone polygons (active selection) actually subtract the column, depending on the "Relation to zone" and the "Extracted column area" property (in blue).
Facit: use General Parameters - Area.
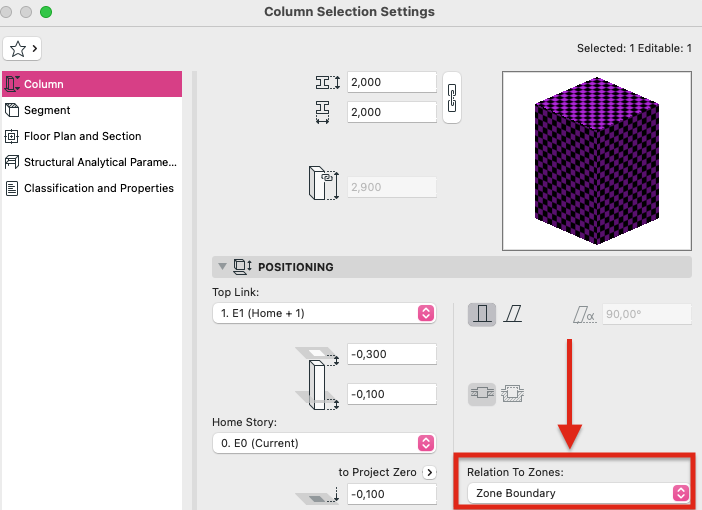
Column Settings: Relation to zone
Project Preferences: Wall and columns subtracted
Project Preferences: Wall and columns not subtracted
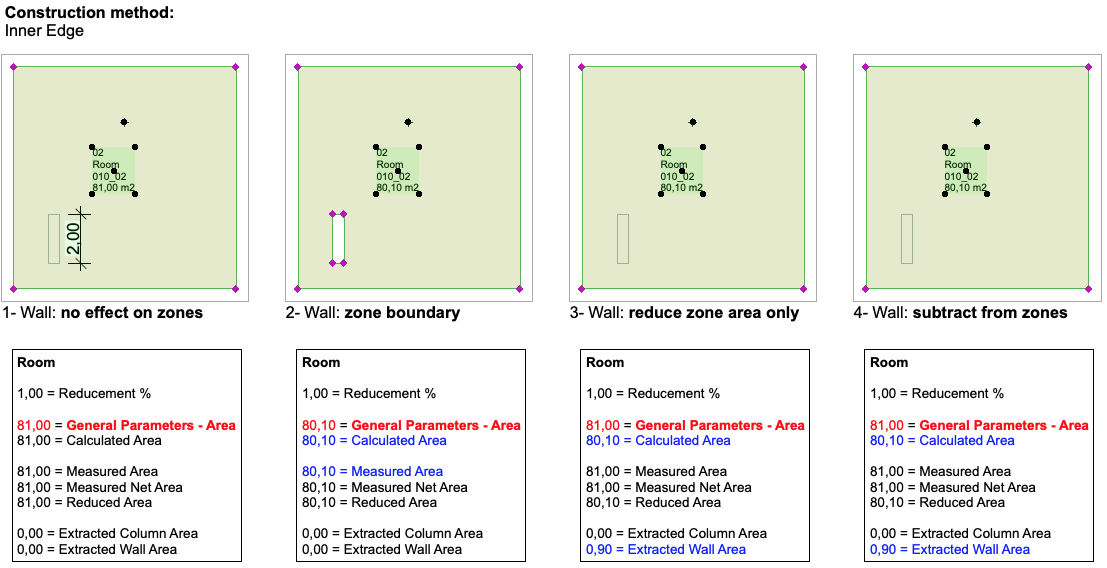
- Wall settings: parameter "Relation to Zones"
Note when the zone polygons (active selection) actually subtract the column, depending on the "Relation to zone" and the "Extracted wall area" property (in blue).
Wall Settings: Relation to zone
Project Preferences: Wall and columns subtracted
Project Preferences: Wall and columns not subtracted